Pav Bhaji Recipe: A Taste of Mumbai at Home!
How to Make Delicious Pav Bhaji: A Step-by-Step Guide
Pav Bhaji is a famous Indian street food with delicious flavors and a spicy taste. It's made with mixed vegetables cooked perfectly and served with soft, buttery buns. If you want to make this tasty dish at home, you're in the right place. In this article, we'll show you how to cook Pav Bhaji just like they do in restaurants, right in your own kitchen.
## Table of Contents
1. About
2. Gathering the Ingredients
3. Cooking the Vegetables
4. Preparing the Base
5. Adding Spices and Flavor
6. Mashing and Mixing
7. *Adjusting Consistency*
8. Final Touch and Garnishing
9. Serving Suggestions
10. Variations of Pav Bhaji
11. Tips for the Perfect Pav Bhaji
12. Frequently Asked Questions (FAQs)
13. FAQ 1: Can I use frozen vegetables for Pav Bhaji?
14. FAQ 2: What is Pav Bhaji masala, and can I make it at home?
15. FAQ 3: Is Pav Bhaji healthy to eat?
16. FAQ 4: What are the best accompaniments for Pav Bhaji?
17. FAQ 5: Can I adjust the spice level to suit my taste?
About:
Pav Bhaji is a yummy dish that comes from the streets of Mumbai, India. People really like it because it has special spices and is very comforting. This dish is made with a mix of vegetables, spices, and soft buns. Now, let's see how to make this tasty street food at home.
Gathering the Ingredients
To make Pav Bhaji, you will need the following ingredients:
- 3 potatoes
- 1 carrot
- 1 capsicum (optional)
- 1/2 cup cauliflower
- 1/4 cup beetroot (for color)
- 1/3 cup green peas (frozen or fresh)
- 1 cup water (for cooking)
- 1 small teaspoon of salt
How To Make Pav Bhaji :
1. Cooking the Vegetables
1. Place all the vegetables in a pressure cooker.
2. Add approximately 1 cup of water and a small teaspoon of salt to the vegetables. The salt helps in faster cooking.
3. Close the pressure cooker lid and cook on medium flame for up to 4 whistles. Do not exceed four whistles.
4. Turn off the gas after four whistles and allow the pressure cooker to cool.
5. After the cooker has cooled, open it and thoroughly mash the vegetables. You can use a potato masher for this.
6. If there's excess water after cooking, do not discard it. You can use this water while making the Pav Bhaji to control its consistency.
2.Preparing the Base
1. In a separate pan, heat 3 tablespoons of oil. You can also add 1 tablespoon of butter for extra flavor.
2. Add 1/2 teaspoon of cumin seeds and 2 medium-sized onions to the hot oil.
3. Fry the onions on medium flame until they turn brown.
4. Once the onions are brown, add 1 tablespoon of ginger-garlic paste and mix it well.
5. Add 3 medium-sized tomatoes to the pan, along with 1/2 teaspoon of salt. Mix it and cover with a lid.
6.Let it cook on a low flame for 3-4 minutes.
7. Remove the lid after a few minutes, ensuring that the tomatoes have softened.
3. Adding Spices and Flavor
1. Now, add the spices:
- 1/2 tablespoon of turmeric powder
- 1 tablespoon of Kashmiri red chili powder
- 2 tablespoons of Pav Bhaji masala
2. Mix the spices well and add a little water to ensure that the masalas cook evenly.
3. If you've used less oil in the Pav Bhaji, you can add water to the spices for proper cooking.
4.Mashing and Mixing
1. Allow the spices to cook on low flame for about 3 minutes along with the onions and tomatoes.
2. Add the mashed vegetables and mix them well. Cook for another 3 minutes over medium flame.
3. The more you mash the vegetables, the closer your Pav Bhaji will be to the restaurant-style texture.
5.Adjusting Consistency
1. Heat 2 cups of water in a pot.
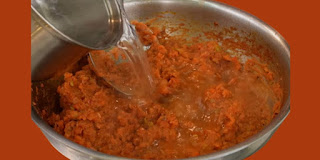
2. Add the hot water to the Pav Bhaji and mix it well.
3. Adjust the salt according to your taste and mash the mixture again. The smoother the Pav Bhaji, the better it will taste.
4. For the right consistency, add a little more hot water and let it cook for 2-3 minutes on low flame.
6.Final Touch and Garnishing
1. Your Pav Bhaji is almost ready. Add 1 tablespoon of butter and some coriander leaves. Mix well.
7. If you want street-style pav bhaji...
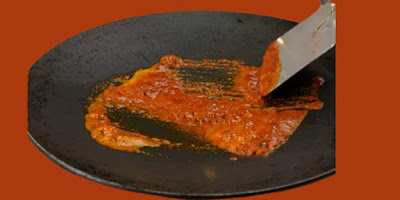
1.For an authentic street style look, prepare a tadka by heating a pan, adding 1 teaspoon of oil and butter, and 1 teaspoon of chopped garlic.
2. Add 1/2 teaspoon of Kashmiri red chili powder and 1/2 teaspoon of turmeric powder, along with 1/2 teaspoon of Pav Bhaji masala. Mix well on low flame without letting the masala burn.
3. Pour the tadka over the already prepared Pav Bhaji and fry on high flame for a moment.This gives it the street-style flavor.
Don't forget to adjust the salt and enjoy this delicious pav bhaji. If you want a home-cooked version, follow the first method, and for the street style, follow the second method. Give this pav bhaji recipe a try!
Serving Suggestions
Serve your Pav Bhaji hot with pav buns. It's traditionally garnished with chopped onions and a slice of lemon. A dollop of butter on top of the Bhaji is a must for the authentic street food experience.
Variations of Pav Bhaji
You can experiment with Pav Bhaji by adding your favorite ingredients like cheese or paneer for a unique twist. It's a versatile dish that can cater to various tastes.
# Tips for the Perfect Pav Bhaji
- Use fresh vegetables for the best taste.
- Don't skip the butter; it's an essential element of Pav Bhaji.
- Adjust the spice level to your liking by adding or reducing chili powder.
- The consistency is crucial, so control it by adding hot water as needed.
# Frequently Asked Questions (FAQs)
FAQ 1: Can I use frozen vegetables for Pav Bhaji?
Yes, you can use frozen vegetables if fresh ones aren't available. Just ensure they're cooked thoroughly.
FAQ 2: What is Pav Bhaji masala, and can I make it at home?
Pav Bhaji masala is a blend of spices specifically created for this dish. While you can make it at home, it's easier to purchase it from a store.
FAQ 3: Is Pav Bhaji healthy to eat?
Pav Bhaji is a delicious treat, but it's not the healthiest option due to the use of butter. Enjoy it in moderation.
FAQ 4: What are the best accompaniments for Pav Bhaji?
Pav Bhaji pairs well with buttered pav buns, sliced onions, and a lemon wedge.
FAQ 5: Can I adjust the spice level to suit my taste?
Certainly! Feel free to increase or decrease the amount of chili powder to match your spice preference.
Happy cooking and bon appétit!

.png)

.jpg)
.jpg)
.jpg)
.jpg)
.jpg)
.jpg)
.jpg)
.jpg)
.jpg)
.jpg)


.png)

.jpg)
.jpg)
.jpg)
Post a Comment